
Trevelyon's Pocket Embroidery finished!
Last time I left you with a photo of Trevelyon's Pocket embroidered and told you that how it looked in that photo wasn't how it looked when it was finished. Today I'll show you how it looks with the embroidery finished and give you an idea of what it will look like once I've finished constructing the pocket.You'll remember that I'd tried padded satin stitch in red silk on the top part of the shape that looks like the clasp. I wasn't happy with that so I took it out.I replaced the red satin stitch with more of the gold chip work. Originally I'd thought chip work for that entire area would be too much bling. However, it didn't work out that way at all. The clasp shape looks so much better all gold. Since it's the only shape in the entire design the isn't organic - not a flower, leaf, vine or stem, it's appropriate that the material and the technique are completely different.Once the embroidery was finished, I needed to take the piece off the slate frame. I'm always excited when removing a piece from the frame since it's the first time I can feel it in my hand.Next came the "test"; would the piece fold into thirds as I planned, making a pocket? I had to make a logical guess that where I thought it should be folded for construction were the same two places Trevelyon thought it should be folded. If I guess wrong, making the pocket was going to be a bit more difficult that I wanted.
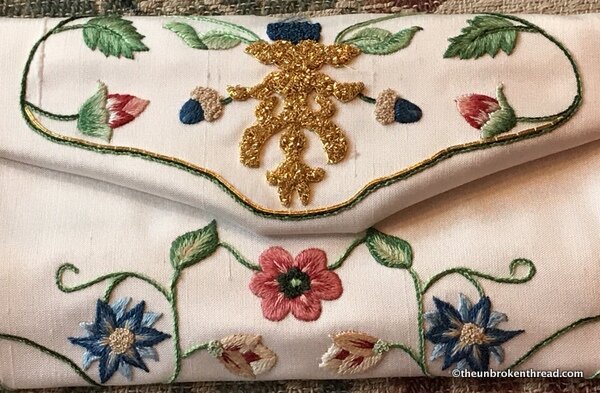 It worked! In fact, the front flap is shaped very much the same way that the front flap on the Bayerische Museum piece is shaped. Both have angled sides coming to a flattened centre point. Granted, the gold "clasp" on Trevelyon's Pocket is all on the top flap while the clasp on the Bayerische pocket is divided between the top and bottom parts of a real clasp.
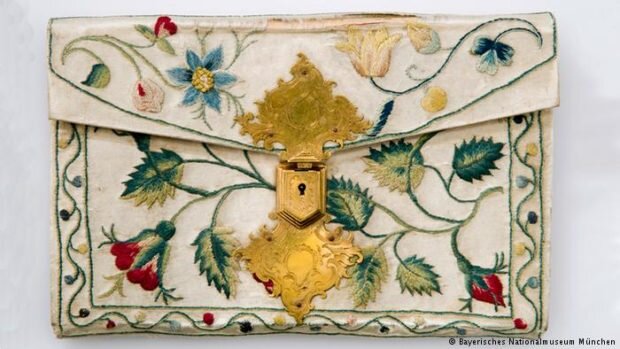 It would have been great if I'd found a real clasp for my pocket but, as I said last time, I had no luck finding anything anywhere.The back of Trevelyon's Pocket looks just perfect. I'm really happy with the arrangement of the flowers and the distribution of colors.
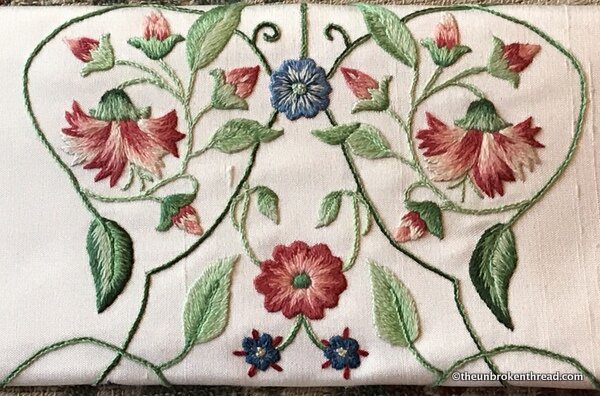 At first glance, I thought the big silly flowers were upside down, but then I noticed that the buds were pointing upwards and it occurred to me that once the flowers opened they would be heavy and would hang downward.The next step is to make a template for the lining and cutting away the excess fabric on the embroidered pocket. That is always nerve wracking! Then I need to construct it by hand and figure out how to make some kind of fastener to keep the pocket closed. Obviously velcro or a snap won't be correct so I am considering a pearl button or even silk ribbons.All suggestions welcomed!