
Trevelyon's Garden - fabric and first stitches
It's been an unsettling few weeks. Not long ago I was taking care of one of my darling granddaughters and planning to go see the other darling granddaughter at the end of March. Now I'm not going to see either one of them for some time until we all feel it's safe for all of us. I am thankful every single day that we live in the age of technology that allows me to see and speak to my family all over the world. It makes such a difference to be able to connect so easily to one another. I hope all of you are safe and staying isolated as much as is possible given your circumstances.Last time I wrote about this project there weren't many details to share! Since then - thanks to having LOTS of time inside to stitch- I've finished the project and am getting ready to assemble it. However, I want to share the process with you so, one step at a time...Most of my needlework is historically inspired. In this instance, I'm using motifs from Thomas Trevelyon and have been inspired by a stunning piece of needlework in the Burrell Museum, Glasgow. When I was in Glasgow a few years ago I was lucky enough to see the piece. Its an embroidered red silk petticoat or skirt. You can see it on the museum's website here.
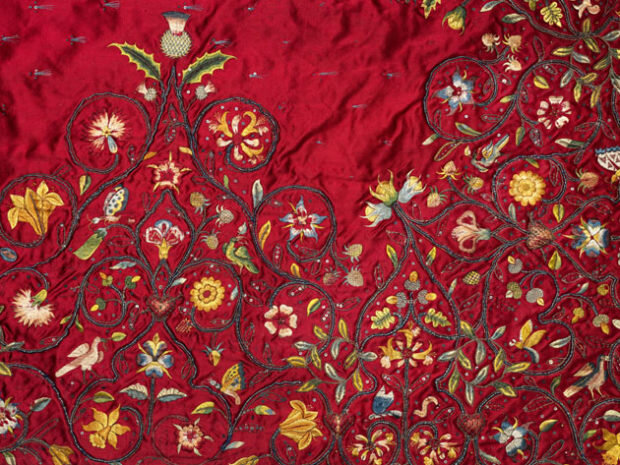
![]() Apparently, the piece was later made into a panel - possibly an altar front - so it survived for us to see today.Imagine, I thought, if it had not survived in such fantastic shape and had been cut up and made into smaller items, such as a pin cushion. We know that embroidered fabrics were reused over and over due to their value. It's certainly within the realm of possibility that something this fine could have been made into smaller items if it had been damaged.Following this imaginary path, I decided to use red silk for the ground fabric and the silk and metal threads I showed you last time.
Apparently, the piece was later made into a panel - possibly an altar front - so it survived for us to see today.Imagine, I thought, if it had not survived in such fantastic shape and had been cut up and made into smaller items, such as a pin cushion. We know that embroidered fabrics were reused over and over due to their value. It's certainly within the realm of possibility that something this fine could have been made into smaller items if it had been damaged.Following this imaginary path, I decided to use red silk for the ground fabric and the silk and metal threads I showed you last time. Transferring the design to the red silk wasn't as difficult as I thought it might be, due to the dark color of the fabric. I'm fortunate enough to have a fabulous LED lightbox and it makes transferring so much easier!
 I backed the silk with calico to support the stitching and then mounted it on my slate frame. Then it was time to stitch!Beginning with the strawberries, I, again, referenced the petticoat for stitch inspiration. The strawberries on part of the petticoat have tiny hair like stitches all around the edges. I decided to use that same idea, but use a DMC Diamant gold thread rather than silk.
 Here's the first strawberry with the little gold straight stitches along the outside edge. You can see the pencil guidelines for where I'll change the shade of pink/red when I stitch the French knots. I've never had such trouble getting accurate color shots before but this red is proving tricky. Still, it's so lush and beautiful in real life I don't mind!
 The first strawberry turned out just as I hoped it would! Sadly, the color of the red silk makes it very difficult to get good photos; the red of the fabric (on my monitor) is closer to the photo above, not below.
 Next time, leaves and more!