
Acorn - Long and short shaded leaves
Long and short shading used to be really scary for me. Avoiding it was at the top of my list when looking for a project. Now, I approach it with pleasure, looking forward to seeing if I can do it better this time.What's made the difference? Two things: practice and a more thorough understanding of the technique. Working on the Talliaferro Royal Persian Blossom crewel work piece was one of the best experiences for gaining confidence. The designer requires long and short shading in quite a few different shapes, so I really had to think about the direction of the shading, the lines I needed to stitch and the curves I needed to accommodate.For the acorn piece, I first marked the section of the leaf, so I was sure to divide the shape correctly when distributing the two colors. I didn't want there to be too much light green and not enough medium green or vice versa. Next, I drew in the stitch direction lines, so I would always see where my stitches were going. Both of these things help enormously and only take a minute to do. When I stitched the leaf, I actually stitched more than 5 sections due to the curve of the shape. The only way to curve when shading is to make shorter stitches, so trying to fit the curve into five divisions within the shape meant that the curve would be gentle and pleasing. Always keep the final look in mind when working and don't be a slave to a diagram or written instructions. Think of it (as I've said before) as longer and shorter shading.When stitching, remember that you need short stitches to create the curves and that the longer stitches do a great job of blending the colors. Go deeply into the previous row of color - half way at least - to get a great blend of colors and a lovely, soft texture.
 When coming to the tip of a leaf or some other pointed end of a shape, it helps to do the middle stitches which will be straight ones first, right the way down to the end of the tip. Then do the outer edges over the split stitch outline and lastly add the filling stitches, gradually shifting direction from the edge stitches, which are at an angle, to the center stitches, which are straight.
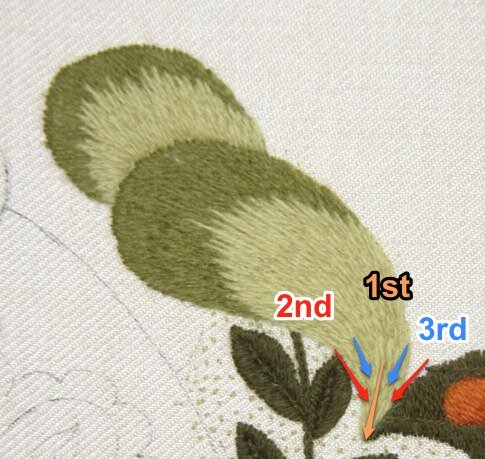 Here's the finished area with the long and short shading and the section of the design from the drawing. It's coming together!

 How do you feel about long and short shading? Do you like it, dread it, approach it with muted confidence, ignore it and hope it never comes up or relish the challenge? Do you have any tips to help us?